Listen up, tech enthusiasts! If you're into the world of IoT (Internet of Things) and looking for ways to remotely access your devices using SSH (Secure Shell) from anywhere, you're in the right place. This guide is all about making your life easier by showing you how to set up IoT SSH access for free on Windows 10 using the command line. No fancy software needed—just pure command-line magic.
Imagine being able to control your smart home devices, servers, or IoT gadgets from anywhere in the world without breaking the bank. That's exactly what we're diving into today. Whether you're a seasoned pro or just starting out, this step-by-step guide will help you harness the power of SSH on Windows 10. Let's get those devices connected and ready for action.
But before we dive into the nitty-gritty, let's talk about why SSH is such a game-changer. It’s secure, reliable, and super easy to use once you get the hang of it. Plus, with the right setup, you can manage your IoT devices remotely without worrying about firewalls or complicated configurations. So, are you ready to take control? Let's go!
Read also:Queen Elizabeths Reaction To Harry And Meghans Decision The Inside Story
Understanding IoT SSH and Its Importance
Alright, let's break it down. IoT SSH is basically a way to securely connect to your IoT devices over the internet. It’s like giving your devices a private line of communication that no one else can tap into. And the best part? You can do all this for free on Windows 10 using the command line. No need for expensive tools or subscriptions.
SSH is especially important in the world of IoT because it ensures that your data stays safe while traveling across the internet. Think about it—your smart thermostat, security cameras, or even your home automation system could be vulnerable if not properly secured. SSH encrypts all your data, making it nearly impossible for hackers to intercept.
Why Use SSH Over Other Protocols?
Here’s the deal: SSH is hands-down one of the most secure ways to manage remote devices. Compared to other protocols like Telnet, which sends data in plain text, SSH encrypts everything. This means even if someone manages to intercept your connection, they won’t be able to read anything without the proper key.
- SSH encrypts all data, making it secure.
- It supports authentication through passwords or public keys.
- It’s widely supported across different platforms and devices.
Setting Up SSH on Windows 10
Now, let’s talk about the setup process. Windows 10 has built-in support for SSH, so you don’t need to install any extra software. All you need is the command line and a few simple commands. Trust me, it’s easier than it sounds.
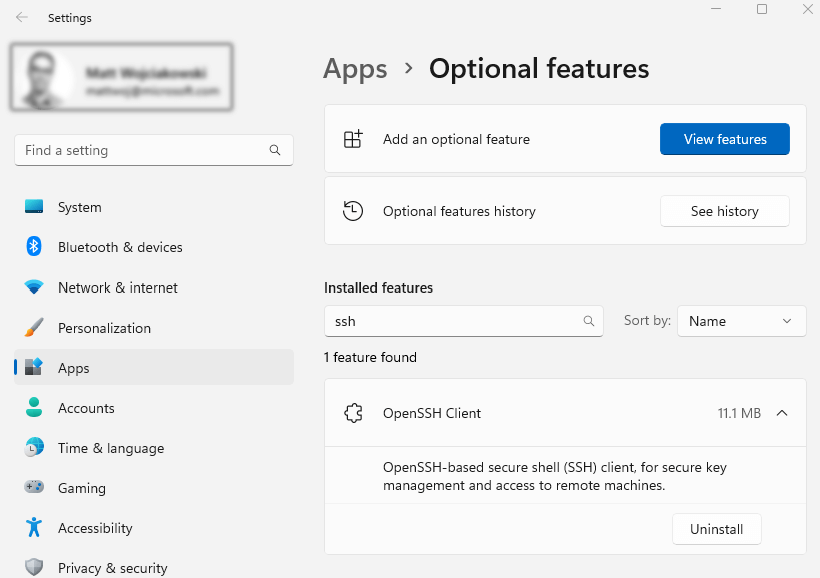
Enabling the OpenSSH Client
First things first, you need to make sure the OpenSSH client is enabled on your Windows 10 machine. Here’s how you do it:
- Go to Settings >Apps >Optional Features.
- Click on Add a feature.
- Search for OpenSSH Client and install it.
That’s it! You’ve now enabled the SSH client on your system. Easy, right?
Read also:Level Up Your Life Tips And Tricks For A Better You
Connecting to IoT Devices via SSH
Once you’ve got the SSH client up and running, it’s time to connect to your IoT devices. Here’s where the command line comes in handy. You’ll need to know the IP address of your device and have SSH enabled on it.
Basic SSH Command Syntax
The basic syntax for connecting to an IoT device via SSH is simple:
ssh username@ip_address
For example, if your device’s IP address is 192.168.1.100 and the username is "admin," the command would look like this:
ssh admin@192.168.1.100
After entering the command, you’ll be prompted to enter the password for the device. Once you’re in, you’ll have full access to the command line interface of your IoT device.
Securing Your IoT SSH Connections
Security should always be a top priority when dealing with IoT devices. Even though SSH is inherently secure, there are still some steps you can take to make your connections even safer.
Using Public Key Authentication
Instead of relying on passwords, you can use public key authentication to secure your SSH connections. Here’s how:
- Generate a key pair using the ssh-keygen command.
- Copy the public key to your IoT device using the ssh-copy-id command.
- Disable password authentication on the device to ensure only authorized keys can connect.
This way, even if someone gets hold of your password, they won’t be able to access your device without the private key.
Troubleshooting Common SSH Issues
Let’s face it—things don’t always go as planned. If you’re having trouble connecting to your IoT device via SSH, here are a few common issues and how to fix them:
Connection Refused
This usually happens if the SSH service isn’t running on your device. Make sure SSH is enabled and running, and double-check the IP address and port number.
Permission Denied
If you’re getting a "permission denied" error, it might be because the username or password is incorrect. Double-check your credentials and make sure public key authentication is set up correctly.
Exploring Advanced SSH Features
Once you’ve mastered the basics, it’s time to explore some advanced SSH features that can take your IoT management to the next level.
Tunneling and Port Forwarding
SSH tunneling allows you to securely forward traffic between your local machine and a remote server. This is especially useful if you need to access services running on your IoT device from anywhere in the world.
For example, you can use SSH tunneling to access a web interface or database running on your device without exposing it directly to the internet.
Best Practices for IoT SSH Management
Here are a few best practices to keep in mind when managing your IoT devices via SSH:
- Always use strong, unique passwords or public keys.
- Regularly update your devices to patch any security vulnerabilities.
- Limit access to only trusted users and devices.
Real-World Examples of IoT SSH in Action
Let’s look at a few real-world examples of how IoT SSH can be used:
Remote Home Automation
Imagine being able to control your smart home devices from anywhere in the world. With SSH, you can securely connect to your home automation system and adjust settings, check sensor data, or even trigger actions like turning off lights or adjusting the thermostat.
Monitoring Industrial Equipment
In industrial settings, IoT SSH can be used to monitor and manage equipment remotely. This is especially useful for preventing downtime and ensuring everything is running smoothly.
Conclusion: Take Control of Your IoT Devices
And there you have it—a comprehensive guide to accessing IoT SSH from anywhere for free on Windows 10 using the command line. Whether you’re managing smart home devices, industrial equipment, or anything in between, SSH is a powerful tool that can help you stay connected and in control.
Remember to always prioritize security and follow best practices when setting up and managing your SSH connections. And don’t forget to share this article with your fellow tech enthusiasts. Who knows? You might just help someone else take their IoT game to the next level.
Table of Contents
- Understanding IoT SSH and Its Importance
- Setting Up SSH on Windows 10
- Connecting to IoT Devices via SSH
- Securing Your IoT SSH Connections
- Troubleshooting Common SSH Issues
- Exploring Advanced SSH Features
- Best Practices for IoT SSH Management
- Real-World Examples of IoT SSH in Action
- Conclusion: Take Control of Your IoT Devices
So, what are you waiting for? Get out there and start connecting to your IoT devices like a pro. Let us know in the comments how this guide helped you, and feel free to share any tips or tricks you’ve discovered along the way. Happy SSH-ing!