Imagine this: you're working on an IoT project, and you need to remotely access your devices from your Mac without breaking the bank. Sound familiar? Well, today we’re diving deep into how to use SSH remote IoT on Mac for free. This isn’t just any guide—it’s your ultimate cheat sheet to mastering remote access without spending a dime. So, grab a cup of coffee, sit back, and let’s get started!
SSH, or Secure Shell, is like a superpower for tech enthusiasts who want to control their devices from afar. Whether you're tinkering with IoT gadgets or managing servers, SSH makes it all possible. But here's the kicker: you don’t need fancy paid tools to do it. Your trusty Mac can handle this task like a pro, and we’ll show you exactly how.
This guide isn’t just about giving you the steps—it’s about empowering you with the knowledge to troubleshoot, optimize, and make the most out of SSH remote IoT connections. By the end of this article, you’ll be a pro at setting up secure, reliable connections without spending a single cent. Let’s make it happen!
Read also:Tom Bradys Heartwarming Moment A Rare Glimpse Into His Family Life
Table of Contents
- What is SSH and Why Should You Care?
- The Basics of SSH on Mac
- Setting Up SSH for Remote IoT Access
- Tools You Need (All Free!)
- Step-by-Step Guide to SSH Remote IoT on Mac
- Troubleshooting Tips for Common Issues
- Security Best Practices for SSH Connections
- Alternatives to SSH for Remote IoT
- Real-World Applications of SSH Remote IoT
- Conclusion: Take Action Now!
What is SSH and Why Should You Care?
SSH, or Secure Shell, is basically a protocol that lets you remotely access and manage devices over a network. Think of it as a secure tunnel that keeps your commands and data safe from prying eyes. For IoT enthusiasts, SSH is a game-changer because it allows you to control your devices from anywhere, as long as you have an internet connection.
Why should you care? Well, if you’re working on IoT projects, chances are you’ll need to manage multiple devices. SSH gives you the ability to do this efficiently and securely. Plus, it’s free! With just a few commands, you can set up a robust remote access system that works seamlessly on your Mac.
SSH vs. Other Protocols
There are plenty of other protocols out there, but SSH stands out for its security features. Unlike Telnet, which sends data in plain text, SSH encrypts everything, making it much harder for hackers to intercept your information. And unlike some proprietary tools, SSH is open-source and widely supported across different platforms.
The Basics of SSH on Mac
MacOS comes with SSH pre-installed, which means you don’t need to download anything extra to get started. All you need is the Terminal app, and you’re good to go. But before we dive into the nitty-gritty, let’s cover some basics.
When you use SSH on Mac, you’re essentially opening a secure connection to another device. This could be a server, a Raspberry Pi, or any other IoT device that supports SSH. The beauty of it is that you can automate tasks, transfer files, and even run scripts—all from the comfort of your Mac.
Why Mac Users Love SSH
- Seamless Integration: SSH works flawlessly with MacOS, so there’s no need for additional software.
- Security: With encryption and authentication built-in, SSH keeps your data safe.
- Flexibility: You can use SSH for everything from file transfers to remote command execution.
Setting Up SSH for Remote IoT Access
Setting up SSH for remote IoT access might sound intimidating, but trust me, it’s easier than you think. The first step is to ensure that SSH is enabled on your IoT device. Most modern devices, like Raspberry Pi, come with SSH pre-installed, so you just need to activate it.
Read also:Halle Berry Opens Up About Her Transformation And Life Choices
Once SSH is enabled on your device, you’ll need to find its IP address. This is the address that your Mac will use to connect to the device. You can usually find this information in your router settings or by running a simple command on the device itself.
Enabling SSH on Your IoT Device
Here’s a quick guide to enabling SSH on a Raspberry Pi:
- Boot up your Raspberry Pi and log in.
- Open the terminal and type
sudo raspi-config. - Navigate to the "Interfacing Options" menu and select "SSH".
- Choose "Enable" and reboot your Pi.
Tools You Need (All Free!)
Before you start setting up SSH, make sure you have the right tools. Luckily, most of what you need is already available on your Mac. Here’s a list of tools you’ll need:
- Terminal: Pre-installed on MacOS, this is where you’ll run your SSH commands.
- SSH Client: Comes with MacOS, so no extra downloads needed.
- Text Editor: For editing configuration files, you can use TextEdit or any other editor you prefer.
- Network Scanner: Optional, but useful for finding your IoT device’s IP address.
Why Use Free Tools?
Using free tools not only saves you money but also ensures that your setup is lightweight and efficient. Plus, with tools like Terminal, you’re learning skills that are valuable in the tech world. It’s a win-win!
Step-by-Step Guide to SSH Remote IoT on Mac
Now that you have everything you need, let’s walk through the process of setting up SSH remote IoT access on your Mac.
Step 1: Find Your Device’s IP Address
To connect to your IoT device, you’ll need its IP address. You can find this by:
- Checking your router’s admin page.
- Using a network scanner app.
- Running the command
ifconfigon your IoT device.
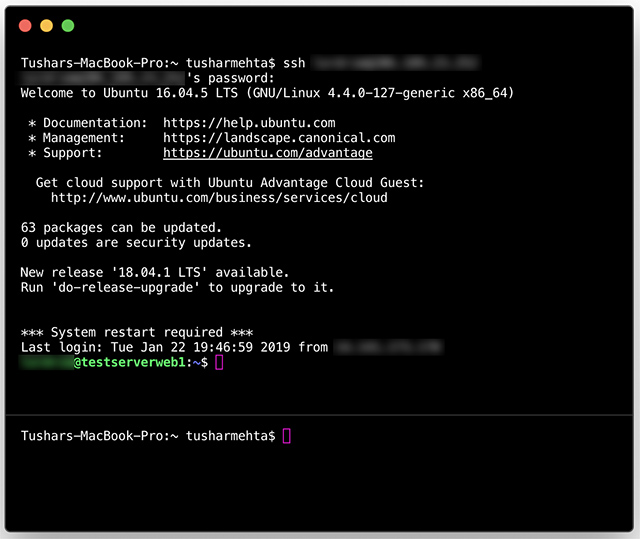
Step 2: Open Terminal on Your Mac
Once you have the IP address, open Terminal on your Mac. You can find it in Applications > Utilities or by searching for it using Spotlight.
Step 3: Connect to Your IoT Device
In Terminal, type the following command:
ssh username@ip_address
Replace "username" with the username of your IoT device and "ip_address" with the actual IP address. Hit enter, and you’ll be prompted to enter a password. Once you’re in, you’ll have full control over your device.
Troubleshooting Tips for Common Issues
Even with the best-laid plans, things can go wrong. Here are some common issues you might encounter and how to fix them:
- Connection Refused: Make sure SSH is enabled on your IoT device and that the IP address is correct.
- Authentication Failed: Double-check your username and password. If you’re still having issues, try resetting the password on your IoT device.
- Network Issues: Ensure that both your Mac and IoT device are connected to the same network.
Advanced Troubleshooting
If you’re still having trouble, consider checking your firewall settings or consulting the documentation for your IoT device. Sometimes, a simple reboot can work wonders too!
Security Best Practices for SSH Connections
While SSH is secure by default, there are still some best practices you can follow to make your connections even more secure:
- Use Strong Passwords: Avoid using common passwords or ones that are easy to guess.
- Enable Key-Based Authentication: This adds an extra layer of security by requiring a private key to connect.
- Limit Access: Restrict SSH access to specific IP addresses if possible.
Why Security Matters
With IoT devices, security is crucial. A single breach can compromise your entire network, so it’s important to take every precaution. By following these best practices, you’ll ensure that your SSH connections are as secure as possible.
Alternatives to SSH for Remote IoT
While SSH is a great option, it’s not the only way to remotely access your IoT devices. Here are a few alternatives:
- Web-Based Interfaces: Some devices come with built-in web interfaces that you can access through a browser.
- Third-Party Apps: Tools like TeamViewer or AnyDesk offer easy-to-use interfaces for remote access.
- Custom Scripts: If you’re comfortable with coding, you can write your own scripts to handle remote access.
Why Stick with SSH?
While alternatives exist, SSH remains the gold standard for remote access due to its security, flexibility, and ease of use. Plus, it’s free! Unless you have a specific need for another tool, SSH is likely your best bet.
Real-World Applications of SSH Remote IoT
SSH isn’t just for hobbyists; it has real-world applications across a variety of industries. Here are a few examples:
- Smart Homes: Use SSH to manage smart home devices like thermostats and security systems.
- Industrial IoT: Monitor and control industrial equipment remotely using SSH.
- Research: Scientists use SSH to access remote servers for data analysis and computation.
How SSH Can Transform Your Projects
Whether you’re building a smart home or managing a fleet of IoT devices, SSH can help you streamline your workflow and increase efficiency. By mastering SSH, you’ll open up a world of possibilities for your projects.
Conclusion: Take Action Now!
In conclusion, learning how to use SSH remote IoT on Mac for free is a valuable skill that can enhance your projects and save you money. By following the steps outlined in this guide, you’ll be able to set up secure, reliable connections to your IoT devices in no time.
So, what are you waiting for? Grab your Mac, fire up Terminal, and start exploring the world of SSH remote IoT. And don’t forget to leave a comment or share this article with your friends. Together, let’s make the internet a safer, more connected place!