So, here's the deal. You’ve probably heard the term "IoT" being thrown around like it's the next big thing. And guess what? It IS the next big thing! But when you start diving into the world of IoT, you’ll quickly realize that managing devices remotely is crucial. That’s where SSH comes in, and when you combine it with AWS, you’ve got yourself a powerhouse for secure access. Access IoT SSH AWS might sound complicated, but trust me, by the end of this guide, you’ll be a pro at it.
In today's fast-paced digital world, securing your IoT devices is no longer optional—it’s essential. Whether you're managing a fleet of smart home devices or overseeing industrial sensors, remote access plays a vital role in ensuring everything runs smoothly. The combination of IoT, SSH, and AWS offers a robust solution that keeps your data safe while providing seamless connectivity. This guide is here to break it all down for you.
Now, before we dive deep into the nitty-gritty, let’s set the stage. By the time you finish reading this, you’ll not only understand how to access IoT devices via SSH on AWS but also how to do it securely. So buckle up, because we’re about to take you on a journey through the world of cloud-based IoT management.
Read also:Ozzy Osbourne Opens Up About His Most Painful Year In An Honest Conversation
Understanding the Basics of IoT SSH AWS
What is IoT, and Why Does It Matter?
IoT, or the Internet of Things, refers to the network of physical devices embedded with sensors, software, and connectivity, allowing them to exchange data. Think of it as the nervous system of the modern world. From smart thermostats to autonomous vehicles, IoT is everywhere. But here’s the catch: these devices need to be managed, and that’s where remote access comes into play.
When you hear "access IoT SSH AWS," what you’re really talking about is using Secure Shell (SSH) to connect to IoT devices hosted on Amazon Web Services (AWS). This setup ensures that your devices are not only accessible but also secure from unauthorized access. Let’s break it down further:
- IoT: The network of connected devices.
- SSH: A protocol that provides secure communication over unsecured networks.
- AWS: A cloud platform that offers scalable infrastructure for IoT deployments.
Together, these technologies create a powerful ecosystem for managing IoT devices remotely. And let’s face it, who doesn’t want that level of control at their fingertips?
Why Use SSH for IoT Devices?
SSH isn’t just some random acronym—it’s your best friend when it comes to securing IoT devices. Here’s why:
- SSH encrypts all data transmitted between your device and the server, making it nearly impossible for hackers to intercept sensitive information.
- It provides a command-line interface for remote management, which is perfect for tech-savvy users who prefer hands-on control.
- SSH supports public-key authentication, which adds an extra layer of security by requiring a private key for access.
In short, SSH is the backbone of secure IoT management. When combined with AWS, it becomes even more powerful, offering scalability and reliability that traditional methods can’t match.
Setting Up SSH Access for IoT Devices on AWS
Creating an AWS Account
Before you can start accessing your IoT devices via SSH on AWS, you’ll need to create an AWS account. Don’t worry—it’s easier than it sounds. Just head over to the AWS website, sign up, and follow the prompts. Once you’re logged in, you’ll have access to a wide range of services, including EC2 instances, which are perfect for hosting your IoT devices.
Read also:Courteney Cox Finds Her Inner Monica With A Hilarious Instagram Post
Here’s a quick checklist to get you started:
- Sign up for an AWS account.
- Verify your email address.
- Set up billing information.
And just like that, you’re ready to roll! Now, let’s move on to the next step.
Launching an EC2 Instance
EC2 instances are virtual servers in the AWS cloud that you can use to host your IoT devices. To launch one, follow these steps:
- Go to the AWS Management Console.
- Click on "EC2" in the Services menu.
- Click "Launch Instance" and choose an Amazon Machine Image (AMI).
- Select an instance type that suits your needs.
- Configure instance details, such as network settings and storage.
- Create or select a key pair for SSH access.
Voilà! You now have an EC2 instance up and running. But wait, there’s more. Before you can start accessing your IoT devices, you’ll need to configure the necessary security settings.
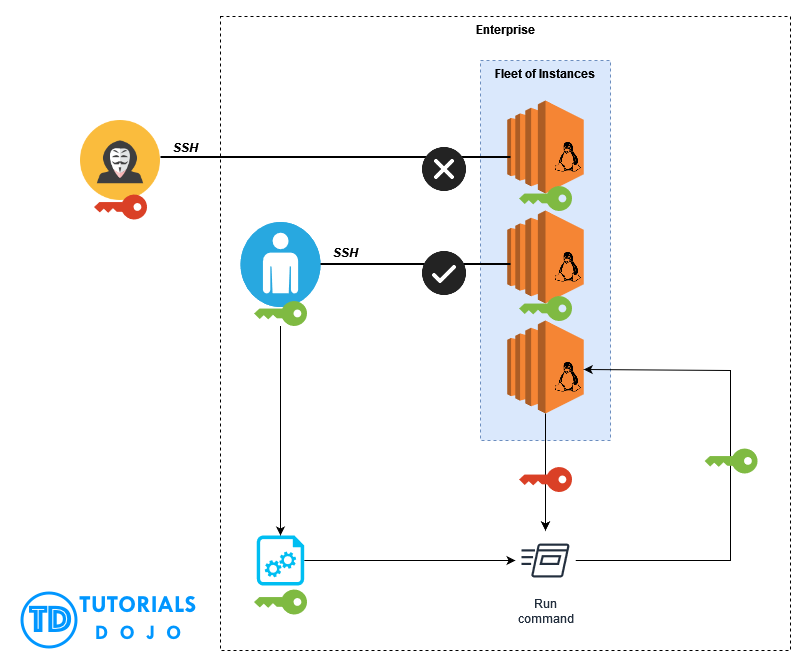
Configuring Security Groups for IoT SSH AWS
What Are Security Groups?
Think of security groups as virtual firewalls that control inbound and outbound traffic to your EC2 instances. They’re essential for ensuring that only authorized users can access your IoT devices via SSH. Here’s how you can configure them:
- Go to the EC2 dashboard and select "Security Groups" from the left-hand menu.
- Click "Create Security Group" and give it a name.
- Add a rule for SSH traffic, specifying the IP address or range that’s allowed to connect.
- Save your changes and associate the security group with your EC2 instance.
By setting up security groups, you’re adding an extra layer of protection to your IoT devices. It’s like putting a lock on your front door—necessary but often overlooked.
Best Practices for Security Configuration
Now that you’ve got your security groups set up, let’s talk about best practices. Here are a few tips to keep your IoT devices safe:
- Use strong, unique passwords for all accounts.
- Enable two-factor authentication (2FA) whenever possible.
- Regularly update your software and firmware to patch vulnerabilities.
- Limit SSH access to trusted IP addresses only.
These simple steps can go a long way in protecting your IoT devices from cyber threats. Remember, security is a marathon, not a sprint.
Connecting to IoT Devices via SSH
Using PuTTY or SSH Clients
Now that your EC2 instance is up and running, it’s time to connect to your IoT devices. If you’re using Windows, PuTTY is a popular choice for SSH clients. For macOS and Linux users, the built-in terminal works just fine. Here’s how to connect:
- Open your SSH client and enter the public DNS of your EC2 instance.
- Specify the port number (usually 22 for SSH).
- Provide your private key or password for authentication.
Once you’re connected, you’ll have full access to your IoT devices. It’s like having a remote control for your entire IoT network.
Troubleshooting Common SSH Issues
Let’s be real—things don’t always go as planned. If you’re having trouble connecting to your IoT devices via SSH, here are a few common issues and how to fix them:
- Connection Timeout: Check your security group settings to ensure SSH traffic is allowed.
- Authentication Failed: Double-check your private key or password.
- Permission Denied: Verify that your user has the necessary permissions to access the device.
With a little troubleshooting, you’ll be back up and running in no time. And hey, if all else fails, Google is your best friend.
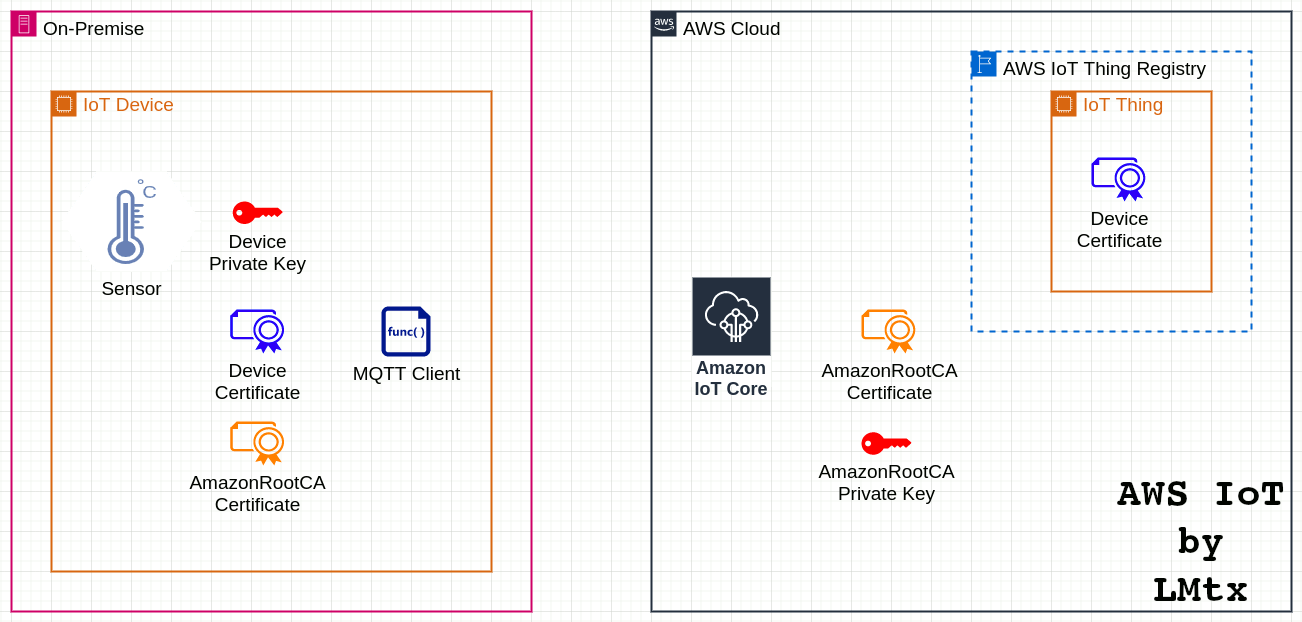
Managing IoT Devices with AWS IoT Core
What is AWS IoT Core?
AWS IoT Core is a managed cloud service that lets you securely interact with billions of IoT devices. It’s like having a personal assistant for your IoT network. With IoT Core, you can easily monitor, manage, and update your devices from anywhere in the world.
Here’s how it works:
- Devices send data to IoT Core using MQTT or HTTP.
- IOT Core processes the data and triggers actions based on predefined rules.
- You can monitor device activity and receive alerts in real-time.
By integrating AWS IoT Core with SSH, you create a powerful system for managing your IoT devices securely and efficiently.
Integrating SSH with AWS IoT Core
Integrating SSH with AWS IoT Core might sound intimidating, but it’s actually quite straightforward. Here’s a step-by-step guide:
- Set up an MQTT broker to handle communication between your devices and IoT Core.
- Configure SSH tunnels to securely connect to your devices.
- Use IoT Core rules to automate tasks, such as updating firmware or restarting devices.
With this setup, you’ll have full control over your IoT network, all while maintaining top-notch security.
Security Best Practices for Access IoT SSH AWS
Encrypting Data in Transit
Encryption is your best defense against data breaches. When accessing IoT devices via SSH on AWS, make sure all data is encrypted in transit. Here’s how:
- Use SSH with strong encryption algorithms, such as AES-256.
- Enable SSL/TLS for additional protection.
- Regularly rotate your encryption keys to minimize the risk of compromise.
By encrypting your data, you’re making it much harder for hackers to intercept sensitive information.
Implementing Access Controls
Access controls are another critical aspect of IoT security. Here’s how you can implement them:
- Create separate user accounts for each team member.
- Assign roles and permissions based on job responsibilities.
- Monitor access logs to detect and respond to suspicious activity.
With these measures in place, you’ll have a secure and manageable IoT network.
Scaling Your IoT Network with AWS
Using Auto Scaling for IoT Devices
As your IoT network grows, you’ll need a way to scale your infrastructure without sacrificing performance. AWS Auto Scaling is the perfect solution. Here’s how it works:
- Set up scaling policies based on metrics like CPU usage or network traffic.
- Automatically add or remove EC2 instances as demand fluctuates.
- Ensure your IoT devices always have the resources they need to function properly.
With Auto Scaling, you’ll never have to worry about running out of capacity again.
Optimizing Costs with Spot Instances
Spot Instances are a cost-effective way to run your IoT workloads on AWS. Here’s why:
- They use spare AWS capacity, which means lower prices.
- You can bid on instances and pay only what you’re willing to spend.
- They’re ideal for non-critical workloads that can tolerate interruptions.
By using Spot Instances, you can save money while still maintaining a robust IoT network.
Conclusion: Taking Control of Your IoT Network
And there you have it—your ultimate guide to access IoT SSH AWS. From setting up EC2 instances to configuring security groups and integrating with AWS IoT Core, you now have the tools you need to manage your IoT devices securely and efficiently. Remember, security should always be your top priority, so don’t skimp on best practices.
So, what’s next? Take action! Start by setting up your AWS account and launching your first EC2 instance. Then, configure your security groups and connect to your IoT devices via SSH. And don’t forget to monitor your network regularly to ensure everything is running smoothly.
Got questions or feedback? Drop a comment below or share this article with your friends. Together, we can build a safer, smarter IoT network. Cheers!
Table of Contents