Are you ready to dive into the world of IoT and cloud computing? RemoteIoT VPC network combined with Raspberry Pi and free AWS resources opens up a universe of possibilities for tech enthusiasts, hobbyists, and professionals alike. Imagine controlling smart devices from anywhere in the world, setting up secure networks, and leveraging cloud power—all without breaking the bank. This is not just a tech dream; it’s a reality waiting to happen.
Let’s be real here—building a remote IoT system sounds like something only tech wizards can pull off. But guess what? With the right tools and knowledge, anyone can do it. Whether you’re tinkering with home automation or planning an enterprise-level project, understanding remoteIoT VPC networks, Raspberry Pi, and AWS is your golden ticket to success.
In this article, we’re going to break it down step by step. We’ll cover everything from setting up your Raspberry Pi to configuring a secure VPC network on AWS. And the best part? You’ll learn how to do all this for free. So, buckle up and let’s get started on this tech adventure!
Read also:Eugene Levy And Catherine Ohara The Untold Story Of Their Friendship
What is RemoteIoT VPC Network?
First things first—what exactly is a RemoteIoT VPC network? Simply put, it’s a virtual private cloud (VPC) environment specifically designed for IoT applications. A VPC acts as a secure and isolated space within the AWS cloud where you can host your IoT devices and applications. Think of it like your own private network in the cloud.
Here’s why it matters: When you connect IoT devices to the internet, security becomes a top priority. A VPC ensures that your devices communicate securely without exposing sensitive data to the public internet. Plus, it gives you full control over network settings, IP addresses, and access permissions.
Now, when we talk about remoteIoT VPC networks, we’re talking about extending this secure setup to work seamlessly with remote devices like Raspberry Pi. This combination allows you to manage IoT projects from anywhere in the world, making it perfect for both personal and professional use.
Why Use Raspberry Pi for IoT Projects?
Raspberry Pi is like the Swiss Army knife of the tech world. This tiny yet powerful computer is perfect for IoT projects because of its affordability, flexibility, and ease of use. Whether you’re building a smart home system, monitoring environmental data, or creating a custom IoT device, Raspberry Pi has got you covered.
Here’s what makes Raspberry Pi stand out:
- Cost-effective: You can get a Raspberry Pi for as little as $35.
- Highly customizable: It supports a wide range of sensors, cameras, and other peripherals.
- Community support: There’s a massive community of developers and enthusiasts who share tips, tutorials, and code.
- Energy-efficient: It consumes minimal power, making it ideal for long-term projects.
By combining Raspberry Pi with remoteIoT VPC networks, you get a powerful setup that’s both secure and scalable. It’s like having a mini supercomputer that you can control from anywhere in the world.
Read also:Leonardo Dicaprio The Hero Beyond The Screen
Understanding Free AWS Resources
Amazon Web Services (AWS) offers a treasure trove of free resources that make cloud computing accessible to everyone. When you sign up for AWS, you get access to a range of services that are perfect for IoT projects. These include:
- AWS Free Tier: This gives you 12 months of free access to essential AWS services like EC2, S3, and Lambda.
- AWS IoT Core: A fully managed service that lets you securely interact with IoT devices at scale.
- VPC: Create and manage virtual private clouds for your IoT projects.
Using free AWS resources means you can experiment with cloud computing without worrying about costs. It’s like having a playground where you can test and refine your ideas without spending a dime.
Setting Up Your Raspberry Pi
Now that you know why Raspberry Pi is awesome, let’s talk about setting it up for your IoT project. Here’s a step-by-step guide to get you started:
Step 1: Gather Your Materials
Before you begin, make sure you have the following:
- Raspberry Pi (any model will do, but Pi 4 is recommended).
- MicroSD card (at least 16GB).
- Power supply (official Raspberry Pi power adapter is preferred).
- Keyboard, mouse, and monitor (optional if you’re using SSH).
Step 2: Install Raspberry Pi OS
Raspberry Pi OS is the official operating system for Raspberry Pi. You can download it from the official website and install it on your microSD card using a tool like Balena Etcher. Once installed, insert the microSD card into your Raspberry Pi and power it on.
Step 3: Connect to the Internet
To connect your Raspberry Pi to the internet, you can either use a wired Ethernet connection or Wi-Fi. If you’re using Wi-Fi, you’ll need to configure the network settings in Raspberry Pi OS.
Configuring a VPC Network on AWS
Now that your Raspberry Pi is set up, it’s time to configure a VPC network on AWS. Here’s how you can do it:
Step 1: Create a New VPC
Log in to your AWS console and navigate to the VPC dashboard. Click on “Create VPC” and follow the prompts to set up a new virtual private cloud. Make sure to configure the IP address range and subnet settings according to your project requirements.
Step 2: Set Up Security Groups
Security groups act as firewalls for your VPC. You’ll need to define rules that specify which traffic is allowed in and out of your network. For example, you might allow SSH access from your IP address but block all other incoming traffic.
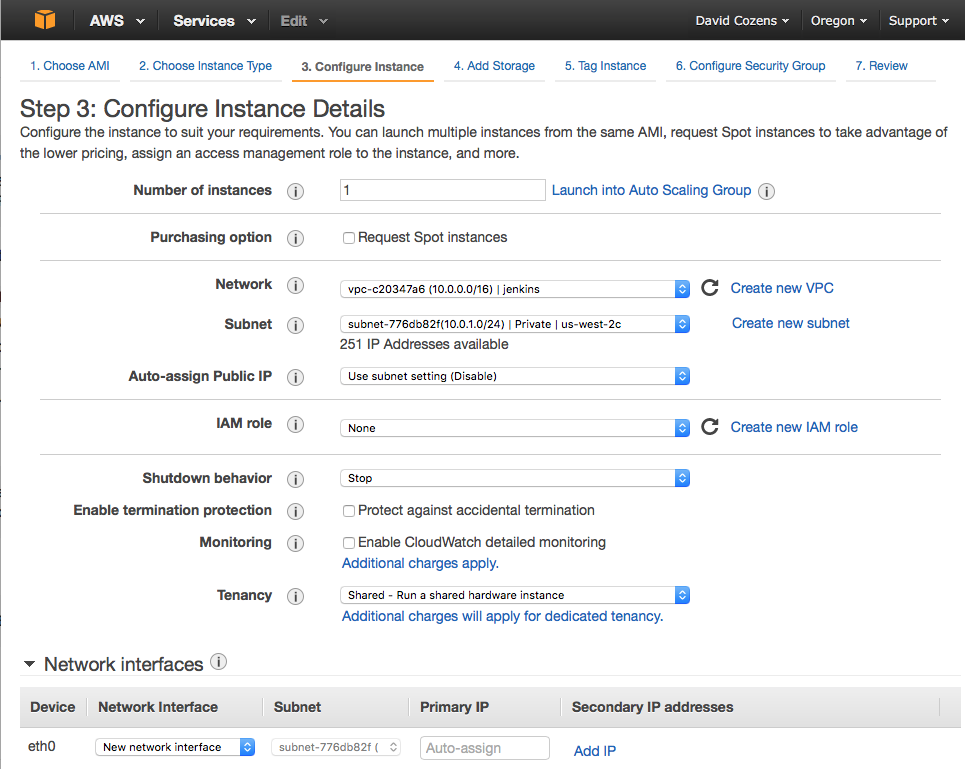
Step 3: Launch an EC2 Instance
Once your VPC is ready, you can launch an EC2 instance within it. This instance will act as a gateway for your IoT devices. Choose an appropriate instance type and configure it according to your needs.
Connecting Raspberry Pi to AWS
With your Raspberry Pi and VPC network set up, the next step is to connect them. Here’s how you can do it:
Step 1: Install AWS CLI
The AWS Command Line Interface (CLI) allows you to interact with AWS services from your Raspberry Pi. Install it by following the instructions on the AWS website.
Step 2: Configure AWS Credentials
Once AWS CLI is installed, you’ll need to configure it with your AWS credentials. This will allow your Raspberry Pi to access AWS services securely.
Step 3: Test the Connection
To ensure everything is working as expected, try running a simple command like `aws ec2 describe-instances`. If it returns a list of your EC2 instances, congratulations—you’re all set!
Securing Your RemoteIoT VPC Network
Security should always be a top priority when working with IoT devices. Here are some tips to keep your remoteIoT VPC network secure:
- Use strong passwords and enable two-factor authentication (2FA) wherever possible.
- Regularly update your Raspberry Pi and AWS services to patch any security vulnerabilities.
- Monitor network traffic for suspicious activity using AWS CloudWatch.
- Limit access to your VPC by configuring strict security group rules.
By following these best practices, you can ensure that your IoT project remains secure and reliable.
Exploring Advanced Features
Once you’ve mastered the basics, it’s time to explore some advanced features that can take your IoT project to the next level. Here are a few ideas:
1. Use AWS IoT Core
AWS IoT Core allows you to connect and manage millions of IoT devices at scale. It supports MQTT, HTTP, and WebSocket protocols, making it perfect for a wide range of applications.
2. Implement Machine Learning
With AWS services like SageMaker, you can implement machine learning models to analyze data from your IoT devices. This can help you make smarter decisions and improve the efficiency of your project.
3. Automate Tasks with AWS Lambda
AWS Lambda lets you run code in response to events without provisioning or managing servers. Use it to automate repetitive tasks and streamline your IoT workflow.
Real-World Applications
Let’s look at some real-world applications of remoteIoT VPC networks, Raspberry Pi, and AWS:
- Smart Home Automation: Control lights, thermostats, and security systems remotely using IoT devices.
- Agriculture: Monitor soil moisture, temperature, and other environmental factors to optimize crop growth.
- Healthcare: Track patient vitals in real-time using wearable IoT devices.
These are just a few examples of how this technology can be applied in various industries. The possibilities are truly endless!
Conclusion
And there you have it—a comprehensive guide to mastering remoteIoT VPC networks with Raspberry Pi and free AWS resources. By following the steps outlined in this article, you can set up a secure and scalable IoT system that’s both affordable and powerful.
Remember, the key to success in the world of IoT is continuous learning and experimentation. Don’t be afraid to try new things and push the boundaries of what’s possible. And most importantly, share your experiences with the community. Who knows? Your next project might just inspire someone else to take their first steps into the world of IoT.
So, what are you waiting for? Grab your Raspberry Pi, sign up for AWS, and start building your dream IoT project today. And don’t forget to drop a comment below and let us know how it goes!
Table of Contents